

NVM – Node Version Manager


Sometimes I need to have multiple Node.js version installed on my machine, maybe it’s only me but if you have my same problem the solution exists and it’s name is NVM.
I usually develop on Windows so I installed NVM for Windows from here, but if you’re on other OS I’m sure you can find a version that supports it, probably this is the answer.
NVM let’s you have multiple Node.js version installed simultaneously on your machine and you can select with which version to work.
With NVM for Windows, in my opinion, four of the most useful commands are:
nvm install
nvm list
nvm uninstall
nvm use
Let’s have a look a little bit more in detail to each command.
install : accept the version of Node.js that you want to install alongside the already installed ones.
list : returns all the Node.js version installed.
uninstall : accept the version of Node.js that you want to uninstall.
use : this command is used to change the working version with the one specified when executing the command.
Examples
Say that you want to install the latest version of Node.js 20, you can achieve it with:
nvm install 20
Which lead to an output like the following:

After the installation you can check all the installed versions using:
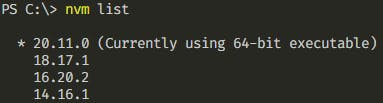
nvm list
In my demo environment the output is the following:

As you can see I’m currently using version 18, I’ve just installed version 20 and I want to start using it, so the next step will be to specify which version NVM should use:
nvm use 20
After specifying the new version the list command would output something like:
Of course you cannot use a version that you haven’t previously installed, saying that you want to use version 19, the result would be:

And that’s it, using NVM you can now use multiple Node.js version on your machine.
Hope this helps!